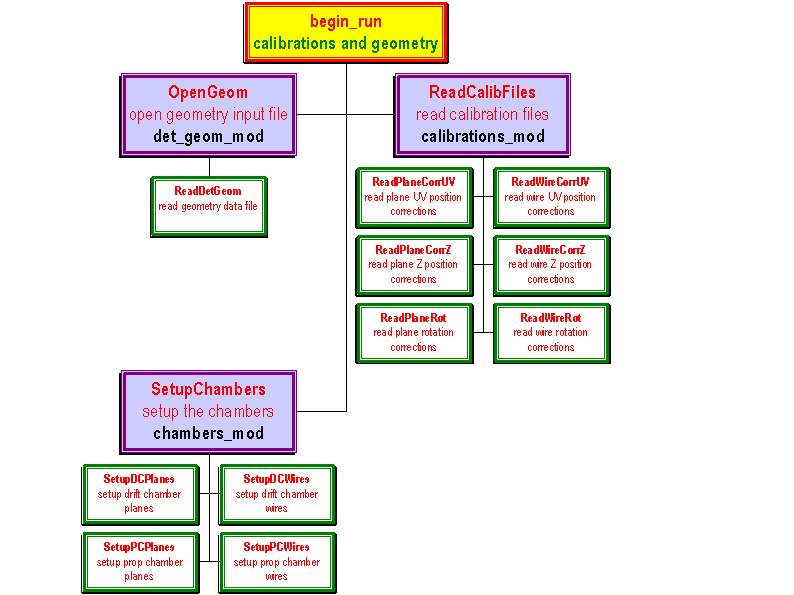
Figure 2. MOFIA 2.0 calibrations and geometry branch.
 MOFIA
2.0
The MOFIA 2.0 initialization branch may be divided into
two parts: geometry implementation and histogram definitions as shown in
Figure 1.
II.1 Geometry and Calibrations
II.1.1 Geometry
As in MOFIA 1.5, the geometry description of the E614 detector is read in from an ascii data file common to both the Monte Carlo and the data analysis codes to ensure consistency. The geometry input file name has the form dt_geo.nnnnn, where nnnnn is the fileís version number (for example, dt_geo.00001 for version 1). The geometry input file is managed through the Calibration File Manager CFM, where the association between version numbers and run numbers is made. This allows us to keep track of any geometry changes in the E614 detector. The module det_geom_mod contains the subroutines OpenGeom, which opens the appropriate geometry file for the run number at hand (by consulting with CFM), and ReadDetGeom which reads in the geometry data file. The geometry results are saved in a common block, det_geom.inc, which is common to both the analysis code and the Monte Carlo code, as is the parameter file det_geom.par, which contains useful geometry parameters. Figure 2 shows a block diagram for the code organization in the geometry initialization branch.

Figure 2. MOFIA 2.0 calibrations and geometry branch.
The module chambers_mod is where all the geometry structures for the drift chamber and proportional chamber are defined and filled. These structures are shown schematically in Figure 3.
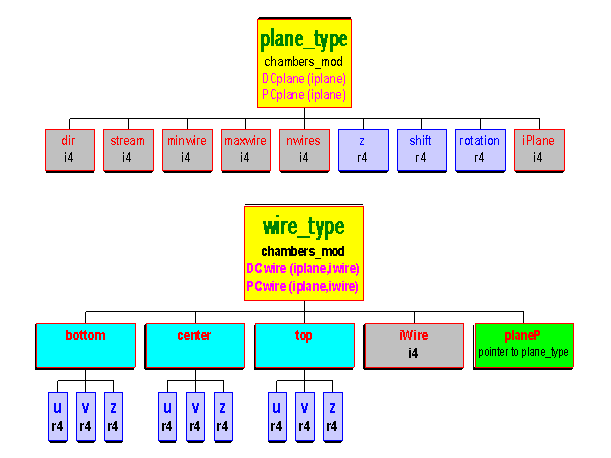
Figure 3. MOFIA 2.0 geometry structures.
The two types of structures, plane_type and wire_type,
include the plane and wire geometry structures, respectively. Each type
has two instantiations, one for the drift chamber and one for the proportional
chamber: DCplane(iPlane), PCplane(iPlane),
DCwire(iPlane,iWire),
and PCwire(iPlane,iWire). Table
1 contains a brief description of the contents of the plane_type
structure.
| Plane_type | Description |
| dir | Coordinate measured by plane ( U or V) |
| stream | Plane location (upstream or downstream) |
| MinWire | Number of the first wire in plane |
| MaxWire | Number of the last wire in plane |
| nWires | Total number of wires in plane |
| z | Z position of plane |
| shift | U or V position of plane |
| rotation | Angular orientation of plane |
| iPlane | Plane number |
Table 1. A brief description of the components in the geometry structure plane_type.
The following are examples of how the first four components of plane_type are used. See chambers_mod for more details.
IF (PCplane(iPlane)%stream == stream%up) THEN
DO iWire = DCplane(iPlane)%MinWire, DCplane(iPlane)%MaxWire
Table 2 contains a brief description of the components
of wire_type. The components iWire
and planeP were introduced in
this structure for the same reason that iPlane
was introduced in the plane_type structure, and their usefulness
will also become evident when the hit structure is discussed.
| wire_type | Description |
| bottom | Wire "bottom" end point position coordinates (bottom%u,bottom%v,bottom%z) |
| center | Wire central position coordinates (center%u,center%v,center%z) |
| top | Wire "top" end point position coordinates (top%u,top%v,top%z) |
| iWire | Wire number |
| planeP | Pointer to plane_type |
Figure 4 shows the calibrations data structures. As shown in this figure, these corrections include U or V and Z position shifts, for each DC plane and wire, as well as rotation corrections for each DC plane and wire. These corrections are included in the geometry structures in chambers_mod, so that the components z, shift and rotation in the plane_type structure already have these corrections in.
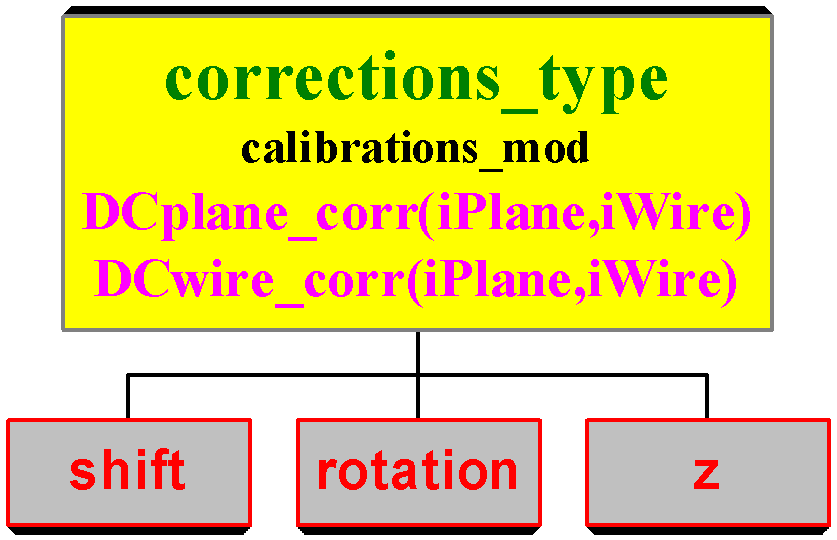
Figure 4. MOFIA 2.0 calibration structures.
Procedures in the module calibrations_mod are accessed through a call from begin_run to the moduleís PUBLIC subroutine ReadCalibFiles, which in turn calls PRIVATE procedures within the module to open the appropriate calibration files for the run at hand (through calls to CFM) and read them in. The contents of the calibrations structures are then accessed in chambers_mod through a USE statement (USE calibrations_mod), and the appropriate corrections are made to the geometry variables.
In addition to these calibration structures, a rotation-correction
parameter is installed in chambers_mod
to allow for an overall rotation of the chambers (DC and PC). This parameter,
ChamberRot,
is in the namelist
DCset and may be assigned values as any
other namelist variable (see subsection namelists).
II.2 Histogramming
Since users tend to define a large number of histograms for purposes of testing their code or analyzing some specific data, in many cases keeping these histograms as part of the official E614 code is not practical. For one thing, CPU time will be wasted filling in histograms that most users donít need; and for another, the number of histograms created becomes large so that sorting through the histogram list to find the desired histogram becomes tedious. The decision was therefore made to provide two histogramming modules. The first, hists_mod, is the module that contains the official histograms that are to be kept and used by all users. The second module, user_hists_mod, is where each user defines their own histograms. The user is responsible for keeping and maintaining their own copy of this module. The default user_hists_mod that is kept with the official E614 code will contain no histogram definitions. If you add your own histograms make sure you donít overwrite your own copy of user_hists_mod when you update your code; save this module under a different name before updating your code. The histogramming branch is shown in Figure 5.
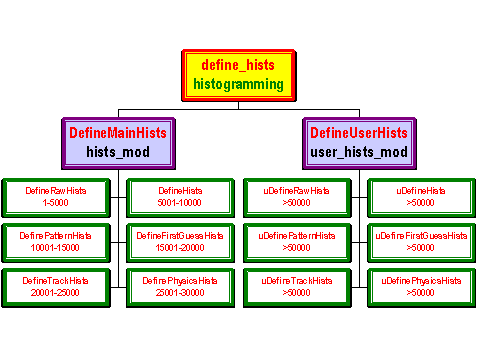
The subroutine define_hists makes two calls, one to the PUBLIC subroutine DefineMainHists in hists_mod, and the other to its counterpart, DefineUserHists in user_hists_mod. These subroutines, in turn, call PRIVATE subroutines within the module, one for each section of the code: raw histograms, histograms after initial filtering, pattern recognition histograms, helix fit "first guess" histograms, tracking histograms, and physics analysis histograms. As seen from figure 5 these subroutines have similar names in the hists_mod and user_hists_mod except that the letter "u" (for user) is prepended to the name in the user_hists_mod.
To avoid conflicts between the user defined histogram
numbers and the main histogram numbers, values between 1 and 50,000 are
reserved for the main histograms; user histograms should always have numbers
higher than 50,000. To avoid conflicting histogram numbers between the
main histograms themselves, a range of histogram numbers has been reserved
for each section of the code, as specified on the chart of Figure 5. Histogram
numbers are assigned to variables in the declaration section of the histogramming
modules. This has two advantages. First, if a histogram number is to be
changed it only needs to be done once (rather than once where the histogram
is defined and once where the histogram is filled) which reduces the potential
for mismatches. Second, if this list is maintained in ascending order it
becomes easy to see which histogram numbers have already been used and
reduces the risk of conflicts.